Posted on Leave a comment

How to Lay Clay Bricks for Driveways & Pathways: A Step-by-Step Guide

A brick-in-sand patio is easy to build and requires just a few basic skills and about 2 days’ work.

It’s a great way to expand the living area of the home and provide an entertainment area for family and friends.

The same brick-in-sand method can be used to provide a convenient, flat pathway keeps your feet out of the mud on a rainy day. Or create a walkway around the house to provide a firm, smooth surface.

Path building is a great project for homeowners of all skill levels

A brick paver walkway is set on a solid bed of gravel and sand.

It will stay flat and smooth even under heavy use, and unlike concrete, it won’t crack due to soil movement.

By using different bonding patterns, you can add a unique decorative dimension.  

If you choose a rustic brick, use the colour variations to create a natural and unique effect.

The installation of clay brick paving is a relatively quick and easy process and, once laid, the pavers can be used immediately.

Low Cost, Easy Maintenance

A patio can be created with many materials, but clay brick pavers are the material of choice for their natural beauty, durability and superior colour retention even when wet. 

Pavers are produced in different colours, dimensions and thicknesses.

Typically, thinner pavers (50mm or less) are suitable for low traffic applications such as domestic driveways, patios and paved walkways.

A paved patio is low maintenance. Clay brick pavers laid on a sand bed will adjust to accommodate to the movement of any underlying earth materials, preventing cracks.

The durability of clay pavers means replacement is generally unnecessary, however, if there is any damage to a paver, they are easily replaced.

It is simply a matter of removing the damaged paver and replacing it with a new one, thereby decreasing any future maintenance costs.

Unlike a timber deck, paved areas are hard-wearing, easy to clean and do not need any expensive year-on-year upkeep.

Why Clay Pavers?

Clay pavers are renowned for their colour integrity which comes from natural pigmentation as opposed to an artificial additive.

They retain the original colour without being affected by any form of ultraviolet light, creating an unmatched richness and warmth for any paved area.

The shape of each paver has a natural, textured character that complements any style of home.

The skid-resistant features of clay brick pavers make it an excellent solution for any heavily trafficked areas that could become wet, such as pathways or even swimming pools.

Clay brick can withstand high temperatures so it is most suitable where you would like to braai. 

Design

Choose your paving bonding pattern – see below figure for ideas.
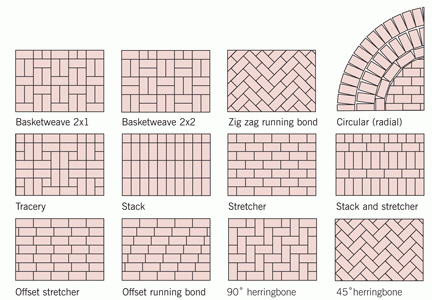
Clay paver floor laying designs
Floor ing brick layouts
  • Basketweave and stack patterns are easy to lay.
  • Stretcher patterns are attractive but will require some bricks to be cut. 
  • Diagonal herringbone patterns are ideal for patios that are an unusual shape but will require a lot of cutting.
  • Slight colour changes can add to the design.
  • Set full bricks at the outer edge to form a “soldier” row i.e. place the outer row perpendicular to the inner rows to form a natural border.

What equipment will you need

Besides your building materials (brick, gravel and sand) the only equipment you will need is a sturdy wheelbarrow and shovels, a brick hammer and chisel and a steel trowel.

Although you can use any flat item for levelling and smoothening edges (e.g. a straight timber beam), a carpenter’s level and line level are practical and useful.

To set the bricks evenly you can use pieces of plywood, but tile shops sell large-size spacers that are easier to use and inexpensive.

Building Materials

Calculate the size of your patio space (in square metres) by multiplying the length by the width – for example a 5m x 3m patio = 15 square metres (m2).

Add 10% to allow for errors and fillers (beginners should add extra).  Please note that the quantities below are only a guide – if your bed is sloped, it may need more sand to level.

If your ground is “boggy”, it may need additional gravel for drainage.

You may choose to add a layer of Bidem to prevent weeds growing through, or special edging.

  • Bricks – your size (m2).  On average, there are 40-50 pavers per square metre.
  • Gravel – your size (m2) x 0.15 (as an indicator, 2,5 tonnes of average gravel material will cover about 15m2).
  • Bedding sand: size (m2) x 0.05 (as an indicator 750kg will cover about 20m2.)
  • Jointing sand: a 40kg bag will cover about 15m2 of paving, depending upon the size of the joint spaces.

This main article can be found at https://claybrick.org.za/19-clay-bricks-paths-and-patios . this is a great article, and it would be of good information to people interested in India

To Order this product you can visit our product page Durable red clay Pavers.

Posted on Leave a comment

AAC Wall Cracks. How & why? Rectify it now!

Avoid AAC wall cracks with the below read. As a supplier of Renacon AAC blocks for areas in & around Chennai and Conecc AAC Blocks for Bengaluru, a few of our customers have raised concerns of AAC blocks cracks. While trying to understand the issue, i had found a great post on https://www.ecorex.in/blogtopic/how-to-avoid-cracking-in-walls-with-aac-blocks-ecorex. The content below is a cut and paste of their article without any editing on our part. Hope it helps!

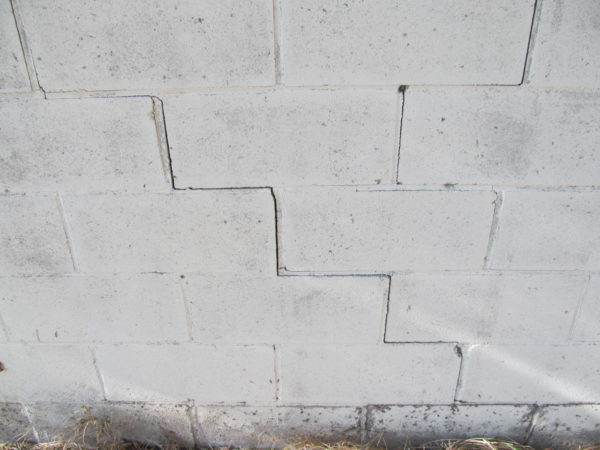
AAC blocks wall crack

How To Avoid Cracking in Walls Built with AAC Blocks 

The lightweight of AAC Blocks is undoubtedly a boon for the construction industry. This feature is a blessing as it comes with numerous benefits while it also poses challenges related to the shrinkage of the masonry and movement in the structural members of the building.

After using bricks and stones for masonry construction for many years, came concrete blocks, hollow blocks, and fly ash bricks. AAC blocks have now carved their niche in the history of masonry construction.

All masonry ingredients require a particular skill so do AAC blocks. Notably, there are a few small differences between brick masonry and AAC block masonry.

Load Bearing And Non-Load Bearing Walls With AAC Blocks

The following are provisions for the construction of load bearing and non-load bearing walls with AAC blocks by IS 6041:1985 for AAC Block Masonry Construction:

  • Load Bearing Walls must have an Internal wall thickness of a minimum of 150mm and an External Wall thickness of a minimum of 200mm.
  • Whereas Internal wall thickness for Non-Load Bearing Walls must be a minimum of 100mm and External Wall thickness of a minimum of 150mm.

How To Avoid Cracking in Walls

The ingredients added to the AAC blocks cause the volume change and aeration in them. The volume change, in any type of concrete, is one of the most detrimental properties. One of the principal products of hydration in the cement paste is the C-S-H gel. This saturated cement paste, when exposed to ambient humidity which is below saturation, loses its dimensional stability. Also, aerated concrete retains more than 20% moisture at the end of the autoclaving cycle. Massive volume change in aerated concrete occurs due to the loss of all this moisture from the blocks. Particularly in the AAC block masonry, unsightly cracks in the masonry wall occur due to volume change. This volume change is a result of shrinkage in the wall. This shrinkage can be drying shrinkage or autogenous shrinkage.

Drying Shrinkage causes Wall Cracks

When the drying shrinkage is restrained, it creates tensile stress. The shrinkage gets restrained due to the end columns once the blocks are built in the masonry. This creates a high amount of tensile stress in the wall resulting in vertical cracks.

It is, however, difficult to make a masonry wall that does not shrink. But practicing engineers can ensure that there is minimal shrinkage. The shrinkage mainly depends on the moisture movement from the AAC blocks. AAC blocks are manufactured at a water-to-cementitious ratio of more than 1.0.

Following is an example that shows chemical water demand per cubic meter of aerated concrete:

The following figures are for uncut volume

Cement content = 101 kg/m3

Lime = 36 kg/m3

Gypsum = 6 kg/m3

Fly Ash participating in Pozzolanic reaction = 35% of the above = 50 kg/m3

Hence total cementitious solids = 193 kg/m3

Water content = 255 kg/m3

Hence w/c = 255/193 = 1.32

Following are the hydration phases of cement that denote the amount of capillary water remaining even after 100% hydration of cement on auto craving for a maximum w/c of 0.95. This water remains residual and gets trapped in the cement paste. A part of this trapped water contributes to the shrinkage of the blocks.

The significantly high pressure of about 12 bars with a 195°C steam drives the steam inside the millions of microscopic pores of the block concrete. A small amount of steam remains trapped inside the pores of the blocks when they are cooled off.

Hence as a combination of water trapped in the cement paste and the moisture left by the steam, the typical free moisture content in a block is to the tune of 25% by weight. Over the next 48 hours, the majority of this free moisture is released from the AAC blocks, the blocks begin to dry which results in major shrinkage within the first 48 hours of the autoclaving. This shrinkage results in wall cracks.

Hence, the precautions that need to be taken while building an AAC block wall so that it remains free of cracks are mentioned below. The IS code 6041:1985 also advises us on ways to avoid cracks in the wall as below: 

The alterations in length, curvature, or orientation of the structural members enclosing a wall or partition due to load settlement, thermal expansion or changes in moisture content cause the Structural Movements Cracks. In the case of framed structures, the erection of partitions and panel walls shall be delayed wherever possible until the frame has been taken up. This also affects structural deformities.

Ceiling deflection and movement – When a load falls on a ceiling above a partition wall it may deflect after its erection or through thermal or other movements.

Control of Wall Movement Accompanying Temperature and Moisture Changes – Tensile stresses which develop when wall movements accompanying temperature and moisture change and are restrained by other elements of the building result in cracking in concrete masonry walls.

Conclusion

The shrinkage and wall cracks in the AAC block masonry construction can be minimized and even avoided by careful application of the blocks and keeping in mind the temperature, load bearing, and other significant details.

[ all credits to the above article go to how to avoid cracking in walls with AAC blocks ecorex | Ecorex ]

We welcome you to visit our complete products at Products. Part of the problem solving in avoiding wall cracks is procuring good quality blocks. We recommend purchasing blocks from us as we do a strong quality control before dispatch and also provide strong customer care in construction